
How automation platforms can streamline SME operations dramatically - a case study
Have you ever tried to automate your standard processes in an efficient way? You may have come across cloud-based tools such as Zapier, IFTTT (If This Then That) or Autopilot. If that’s the case, you will have seen how they can facilitate a very diverse array of possible automations and integrations between systems. However, it can be challenging for the casual user to actually realise the full potential of such a vast number of possibilities.
I specialise in these types of automations and there’s virtually nothing that can’t be done once you tap into all the available solutions - many of which are free to some extent (Google Suite or IFTTT are good examples). There is a clear process to follow in order to automate a specific workflow successfully. We share below a real case study as a base to exemplify such a process.
1. Clearly map the process / actions you have in mind
Flow charts are an easy and powerful way to do so. The idea is to have a simple sketch of how the information needs to flow inside and / or between platforms.

2. Analyse the apps, triggers and actions in the platform you want to use.
In this case, we decided to work with Zapier and all necessary inputs were available. An example for the Xero app in Zapier can be found here. Note that the specific fields available in each action are not visible unless you create the connection in your account and test that action within a zap.
3. Translate the process mapped into specific action steps in the given platform
Depending on the complexity of the process, you may be able to do this alone or, otherwise, you can consult with an expert who can quickly assess what’s needed.
Example:
Automation a:
In our example, we had 2 different companies owned by the client and using 2 different accounts in Stripe. As such, we needed to create 2 zaps (automation flows within Zapier) in parallel to catch the right information for each company. Below you can see how one of these zaps looks like:
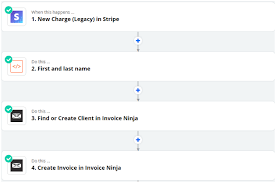
As you can see, steps 1, 3 and 4 are predefined in Zapier. In other words, these are actions that are already integrated and ready to use. However, we had to create step number 2 to overcome a challenge not foreseen in the off-the-shelf actions. Stripe provided the customer’s name and surname together in the same field. However, Invoice Ninja required the name and surname to be provided in two different fields. We also used this step to make a VAT calculation needed down the line. Step 2 type is called ‘Code step’ and it allows Zapier users to add code (in Javascript or Python) to process information. This is what it looked like in our example:

One thing worth mentioning is that the first step in the sequence is always the trigger. In other words, the event that starts the automation every time. In this case, a new charge in Stripe.
Automation b:
The final action in each one of the 2 parallel zaps becomes the new trigger for a new zap. Why are we using a new zap when we could keep adding actions to our parallel zaps in automation a? Simple, it will make it easier to create this part of the process and update it if anything changes (instead of duplicating any amendments needed). This is how zap b looks like in Zapier:

Once again, we were able to tap into a ‘Code step’ to expand Zapier’s capabilities to overcome the following challenges around converting the information from the incoming format (Invoice Ninja) to the receiving app (Xero) format:
- Identify what Xero account to use depending on the invoice notes.
- Pick up either the Company Name or Contact name depending on whether the customer is an individual or a company.
- Parse the product list into the right format for Xero.
You can see the code used below:

4. Testing
Make sure that everything works well and try to account for edge cases that may require you to fine tune the process. Examples would be:
- What happens if the user doesn’t exist in the destination app? This is why we used the ‘Find or create Contact in Xero’.
- Do I have all the information I need from the trigger event / app? As an example, we had to add step b.2 where the pdf of the invoice (which had to be added to the Xero invoice in b.6) was returned in addition to the standard information provided by the trigger step.
This simple process may take a bit of time to design and set up but it saves a significant amount of manual intervention and subsequent work hours going forward. In our example, before setting up the automation, the client had to manually create the invoices in 2 different platforms every time a new payment was generated. If you try to map out every automatable process in your company, imagine the time-saving potential of these user friendly tools!
Thanks for reading.